How to Change Schedule Time on Easy Dental
The Appointments Module is where patient appointments are scheduled.
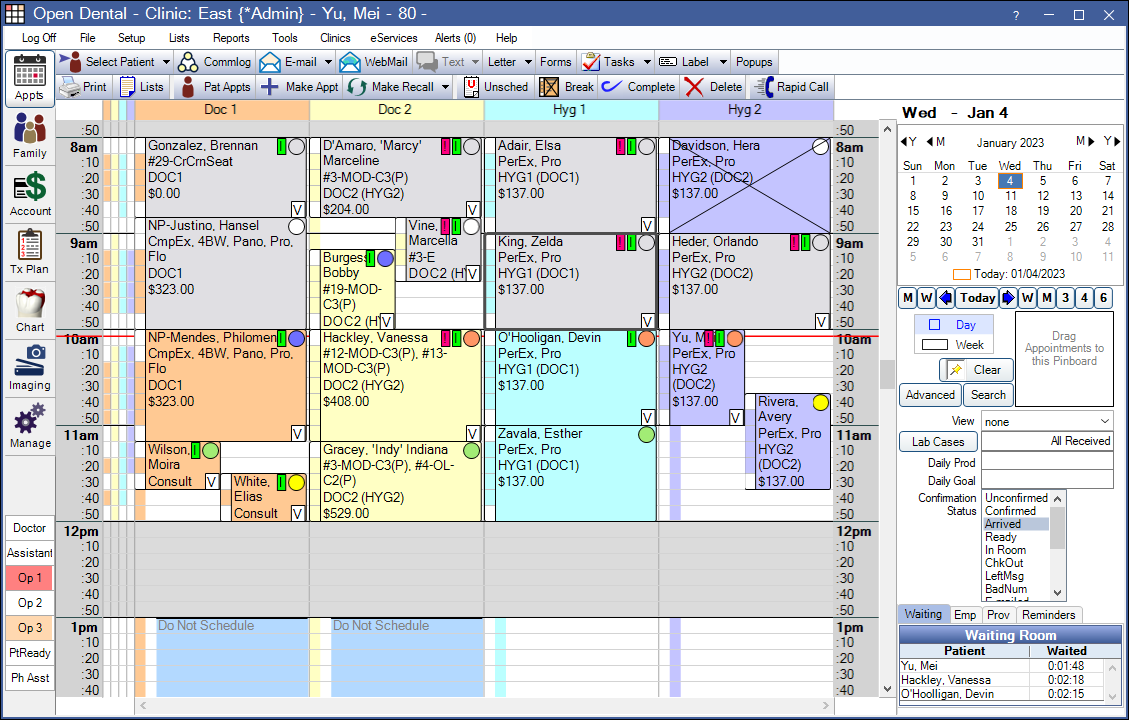
From here you can easily schedule, view, and manage appointments.
Appointments Toolbar
These buttons appear in the top toolbar.
![]()
- Print: Print the schedule. See Print Appointments.
- Lists: Opens Appointment Lists.
- Pat Appts: View the patient's appointment history and family recall information. See Patient Appointments.
- Make Appt: Schedule an appointment.
- If this is an appointment for a new patient, or the patient has only completed appointments, the Edit Appointment Window will display.
- If the patient has scheduled, broken, unscheduled, or planned appointments, the patient's appointment history will open so you can check appointment history before scheduling.
- Make Recall: Schedule the patient's next Recall Appointment. Patient must be due for a special recall type.
- To schedule recall for a family, use the dropdown to select Make Fam Recall.
- If the patient has a scheduled appointment, or an appointment on the Unscheduled List, the patient's appointment history will open. Otherwise, the appointment is copied to the Pinboard.
- Appointments will be created and sent to the Pinboard. Recall procedures that are not attached to a special recall type will be added to appointments automatically along with the special recall if they are due on or before the same date.
- If the schedule is Day View, the Search function will be brought up.
- When using Make Recall: If the patient's secondary (or primary if no secondary is assigned) provider has openings after the patient's recall due date, the schedule will move to the first date. The search box will show additional available dates. .
- When using Make Fam Recall: Open Dental will search for openings for all family members' providers starting after the due date for the family member with the furthest out recall due date. If there are any available openings after that date, the schedule will move to the first available date. The search box will show additional available dates.
- Unsched: Send the selected appointment to the Unscheduled List.
- Break: Break the selected appointment. See Breaking Appointments.
- Complete: Set the selected appointment as complete. See Setting Appointments Complete
- Delete: Delete the selected appointment. See Deleting Appointments.
- Rapid Call: If the DentalTek Rapid Call Bridge is enabled, launches the Rapid Call application. Otherwise, opens the DentalTek Rapid Call website.
Calendar
Use the calendar to quickly switch days to view past and future appointments. Today's date is surrounded by a square, the selected date is highlighted.
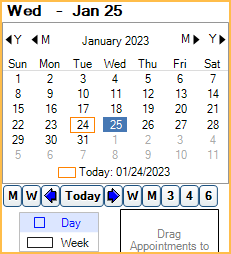
Click on a date to quickly jump to the day or week in the schedule.
- Change the day: Click on the new date, or click the blue arrows to jump back/forward one day.
- Change the week: Click the W buttons to jump back/forward one week.
- Change the month:
- Click the arrows to the left/right of the month to jump back/forward one month at a time. When changing the month this way, the schedule will not load a new date until the user selects a date from the calendar.
- Click the M buttons to jump back/forward one month. When changing the month this way, the calendar will automatically select the currently highlighted day for the new month, and the schedule will automatically load with the newly selected date.
- Today: Jump to today's date.
- 3: Jump three months in advance from the currently selected date.
- 4: Jump four months in advance from the currently selected date.
- 6: Jump six months in advance from the currently selected date.
- Change the day/month/year: Right-click the month/year at the top. When the date window pops up, enter the date to jump to.
Day or Week view: Set using the radio buttons under the calendar. Set a default in Appointments Module Preferences.
- Day: Grid will be divided into operatories.
- Week: Grid will be divided into seven days (Monday through Sunday). The appointments will appear narrow, so hovering over the appointment to view bubble popups may be useful. Move appointments within the current week by dragging and dropping, or use the pinboard.
Pinboard and Searching for Openings
The Pinboard can be used for easy scheduling between days or weeks.
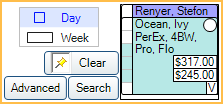
Drag or send appointments to the pinboard, then drag onto the schedule. You can also search for openings. See Pinboard for details.
Appointment Views
Appointment Views determine the operatories and providers that show and the information that shows in an appointment. It also determines the default start time when Open Dental is first opened.
![]()
The default appointment view when a user logs on will be the same view active when the user last logged out. Click the dropdown to change views or press the associated function key across the top of your keyboard.
When Clinics is enabled, the appointment views are associated with specific clinics. Changing the clinic in the main menu will change the appointment view options and the appointment view..
Lab Cases and Production
Track the status of lab cases and view estimated production.
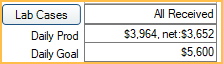
Lab Cases: Indicates the status of lab cases for the selected date. If clinics is turned on, only the status of lab cases attached to appointments scheduled in the selected clinic's operatories, for the selected date will show. If Headquarters is the selected clinic, the status of all lab cases attached to appointments scheduled in all operatories for the selected date is shown (including those not associated with a clinic). See Dental Lab Cases.
Daily Prod: View the daily production sum. Production must be added to the appointment view in order to view a value. Also see Production Totals.
- By default, the value reflects the daily production sum for all procedures attached to appointments where at least one provider has a provider bar showing in the appointment view.
- To instead calculate the sum for all procedures scheduled in operatories that show in the appointment view, check Appointment module production use operatories in Appointment Module Preferences.
- To calculate adjustments in the net production total, see Appointment Module Preferences, Add daily adjustments to net production.
- If the gross and net amounts are the same, only one number shows.
- If you see two numbers, the first number is the gross (sum) of the procedure fees. The second number is the net after subtracting all write-offs and write-off estimates.
- The net production amount reflects write-off estimates. If the write-off estimate changes, the net production will update to reflect this. Once an insurance claim is received the net production total reflects the actual write-off.
Daily Goal: View the total daily production goal for all scheduled providers in the appointment view. The value is calculated using the hourly production goals for each scheduled provider, as entered on the Edit Provider Window. Production or NetProduction must be added to the appointment view.
Confirmation Status and Other Tabs
Change the confirmation status of an appointment, and use tabs to track various information.
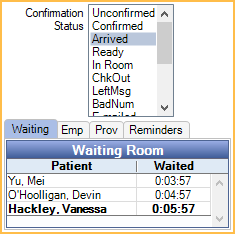
Confirmation Status: Quickly change an Appointment Confirmation Status. The option is grayed out if the user does not have the ApptConfirmStatusEdit security permission. Some statuses trigger Time Arrived, Time Seated, and Time Dismissed values, which affect the waiting room. Status options can be customized in Definitions: Appt Confirmed.
Waiting: See Waiting Room.
Emp: View scheduled hours for employees for the selected day. Only employees scheduled in the selected clinic are listed. Double click anywhere in the grid to edit the schedule.
Prov: View scheduled hours for providers for the selected day. Only providers scheduled in the selected clinic are listed. Double click anywhere in the grid to edit the schedule.
Reminders: View all Task Reminders for the logged on user that are due for the current day, ordered by date and time. Reminders will only show here through the end of the current day. An asterisk appears in the reminders tab when there are reminders for the current day.
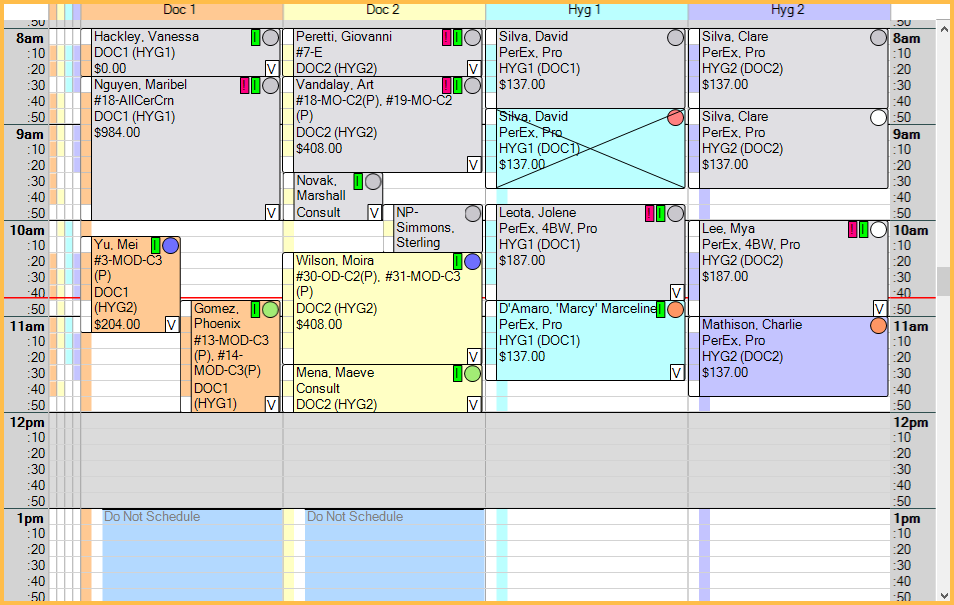
The Schedule
Time: Use the vertical scrollbar to move through the entire 24 hour day. The time increment is a global setting. See Time Increments in Appointment View Setup.
- The default start time is determined by the selected appointment view. It can be a set time or dynamically start at the earliest appointment or provider time.
- Current time is indicated by a horizontal time line that automatically moves down every minute. Customize the line color in Appointments Module Preferences.
- Vertical Time Bars show as color-coded visuals of appointment length and provider time.
Operatories: Define operatory names, colors, and order in Operatory Setup.
- Click on an operatory header to view the default provider's name and specialty, the name of scheduled providers, their time blocks, and note, any note for the selected clinic, and the daily production totals for the operatory.
- Hover over an appointment header to view provider name and production totals.
- Right-click on an open time block in the operatory to add, edit, or clear Blockouts.
Colors: By default, white areas indicate open times, grey indicates closed times (see Schedule Setup).
Appointments: Basic appointment details show in an appointment box. Double-click the box to open the Edit Appointment Window or right-click to select more options. Every appointment has a second optional provider for hygiene so that only one appointment has to be made even if a patient is technically seeing two providers.
- Depending on your preferences, appointment details may pop up when you hover over the appointment. To customize the appointment bubble, see Display Fields.
- As appointments are set complete, they are greyed out by default.
- Broken appointments are marked with an X.
- If overlapping appointments are enabled in Appointments Module Preferences, they will be ordered from oldest creation date to newest, starting on the left.
Moving Appointments:
- Completed appointments cannot be moved to the pinboard or, when using Week View, a different day. Completed appointments can be dragged to a different operatory or time on the same day as scheduled.
- When moving an appointment marked Is Hygiene to an operatory that is not marked Is Hygiene, the Is Hygiene checkbox on the appointment will not be unchecked automatically. To uncheck this box, so the hygienist is no longer the main provider on the appointment, see Edit Appointment
- When moving an appointment to an operatory marked Set Prospective, users will receive a prompt to set the patient's status to Prospective. Clicking OK will change the patient's status and disable any existing recall. See Operatory Setup for more information.
- To move an appointment, simply click and drag it to a different time, day (in Weekly view), or to the pinboard.
- When moving an appointment to an operatory, users will be prompted to update the provider if the current appointment provider differs from the operatory.
- If the provider is updated, users will also be prompted to update the appointment length if it the appointment length does not match the default time pattern and the Time Locked checkbox is checked.
Right-click options:
- On an Appointment:
- Copy to Pinboard: Copy the appointment to the pinboard.
- Send to Unscheduled List: Send the appointment to the Unscheduled List.
- Break Appointment: Break the appointment. See Break Appointment.
- Mark as ASAP: Mark the appointment as ASAP and add it to the ASAP List.
- Set Complete: Complete the appointment.
- Delete: Delete the selected appointment.
- Patient Appointments: Click to view other Patient Appointments.
- Print Label: Print single appointment reminder Labels.
- Print Card/Print Card for Entire Family: Print a future appointment reminder postcard for a single patient or family. Reminder cards cannot be customized.
- Routing Slip: Print Routing Slips.
- Go To Ortho Chart: Open the Ortho Chart for the selected patient. Only shows when information exists in the Ortho Chart or this option is enabled in Ortho Setup. Customize the text that shows in Ortho Chart Setup.
- Call Home Phone: Click to call the home phone for the selected patient. Requires an additional service. See DentalTek Bridge.
- Call Wireless Phone: Click to call the wireless phone for the selected patient. Requires an additional service. See DentalTek Bridge.
- Send Text: Send a text message. Opens a blank text message window. See Sending a General Text Message.
- Send Confirmation Text: Send a text message using the default confirmation message. See Confirmation List Setup.
- Send eClipboard BYOD Text: Send a text message to the patient that includes a link to eClipboard so the patient can check-in using BYOD. See eClipboard Setup.
- Send Come In Text: Send a message notifying a patient their appointment is ready. Only available when the patient has already been sent an automated Arrival. See Arrivals.
- CareCredit: Appears when CareCredit is not enabled. This option is hidden when advertising for CareCredit is turned off.
- CareCredit Accept/Decline Offer: Only displays for CareCredit users. Available for patients with a Quickscreen status of pre-approved.
- CareCredit Application Needed: Only displays for CareCredit users. Available for patients with a Quickscreen status of unable to pre-approve.
- On an Empty part of the Schedule:
- Blockout Options: For detailed breakdown of these options see Blockouts.
- Text ASAP List (manual): Open ASAP List.
- Text Appointments for Day, Op only: Opens window below. Allows you to send the same message to all patients with an appointment in the operatory and day based on where you right-click.
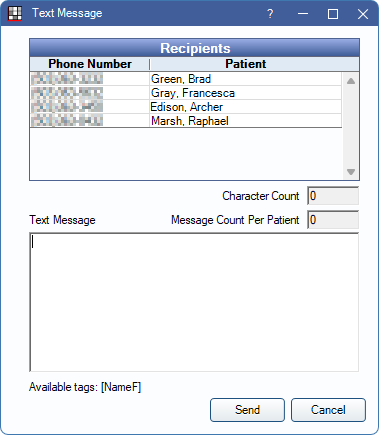
Note: For multiple patients with the same wireless number a single message will be sent.
- Text Appointments for Day, Current View only: Same as above, but for all appointments in the current Appointment View.
- Text Appointments for Day, Clinic only: Same as above, but for all appointments for the currently selected Clinic.
- Update Provs on Future Appts: See Update Provs on Future Appts.
Source: https://www.opendental.com/manual/appointments.html
0 Response to "How to Change Schedule Time on Easy Dental"
Postar um comentário